DIY gutter repair guide: prevent costly water damage fast
DIY gutter repair guide: prevent costly water damage fast
A single clogged or cracked gutter can quietly funnel hundreds of gallons of water toward your foundation every time it rains. In Upstate New York, where freeze-thaw cycles hammer homes from November through April, that damage compounds fast. This gutter repair DIY guide walks you through every stage of the process, from gathering tools to verifying your fix, so you can protect your home before a small problem turns into a five-figure repair bill.
Key Takeaways
| Point | Details |
|---|---|
| Gather the right tools | Using proper tools and exterior-grade sealant makes repairs safer and more effective. |
| Safety is critical | Always secure ladders and wear protective gear before starting gutter repairs. |
| Follow a repair workflow | Inspect, clean, repair, seal, and verify your gutters to ensure years of worry-free performance. |
| Know when to replace | Sagging, rot, and chronic overflow are signs patching won't solve the problem—replacement is needed. |
| Adapt for Upstate NY weather | Allow extra time to cure repairs and check slope after winter freeze–thaw cycles. |
Essential tools and materials for gutter repair
Before you climb a single rung, you need the right gear on the ground. Showing up at the top of a ladder only to realize you forgot sealant or the right fasteners is not just inconvenient — it is how mistakes happen. Here is everything you need for a complete DIY gutter maintenance session.
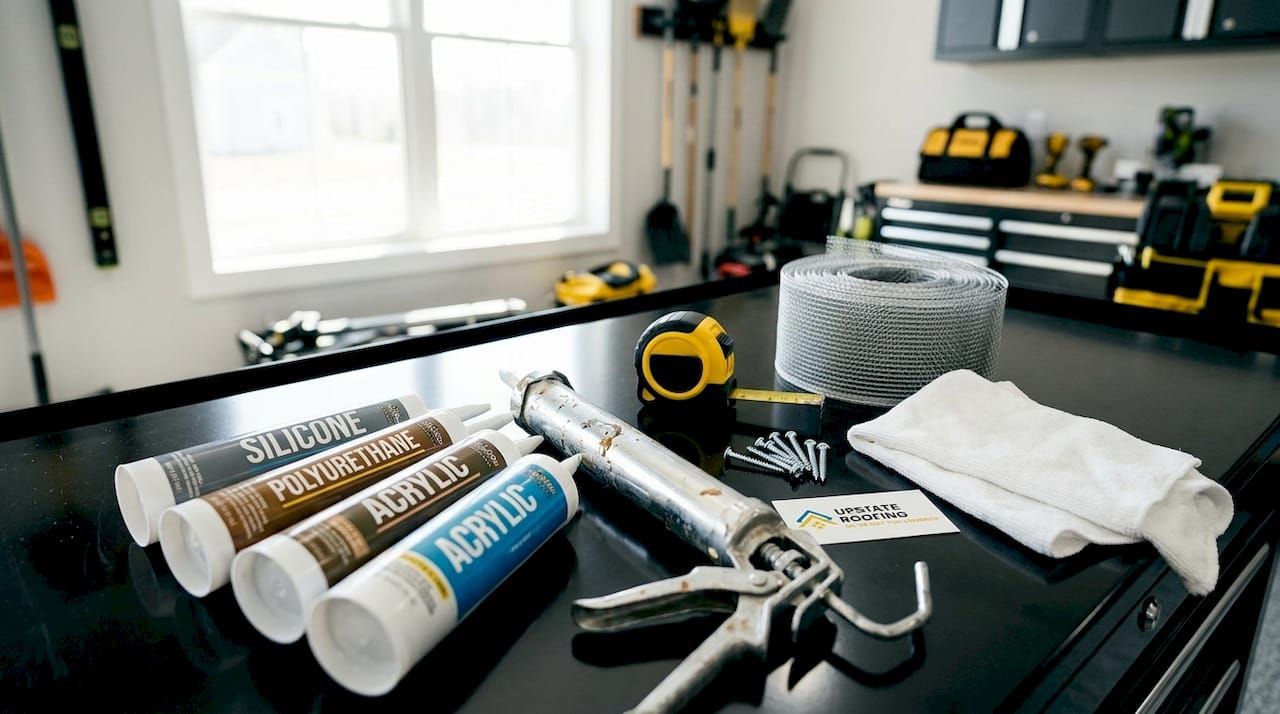
Tools and materials checklist:
- Heavy-duty work gloves and safety glasses
- A stable extension ladder with a stabilizer bar
- Gutter scoop or small trowel for debris removal
- Garden hose with a spray nozzle
- Stiff-bristle brush
- Exterior-grade gutter sealant (silicone or polyurethane)
- Sheet metal screws or gutter spikes and ferrules
- Gutter patching material or flashing tape for larger holes
- Caulk gun
- Bucket for debris
The sealant choice matters more than most people realize. Not all exterior sealants are compatible with aluminum, vinyl, or galvanized steel gutters. A silicone product designed for metal may not bond properly to vinyl, and applying it over a dirty or damp surface guarantees failure. Our gutter cleaning tips page covers surface prep in more detail, and it is worth reviewing before you buy anything.
| Material | Best sealant type | Notes |
|---|---|---|
| Aluminum | Silicone or polyurethane | Most common in Upstate NY homes |
| Vinyl/PVC | Polyurethane | Avoid pure silicone; poor adhesion |
| Galvanized steel | Urethane-based | Rust-treat surface first |
| Copper | Silicone | Use sparingly; avoid flux residue |
As This Old House notes , DIY gutter repair is only recommended for homeowners who are comfortable with ladder work and power tools. If heights make you nervous or you have never used a drill, the safety risk can outweigh the savings.
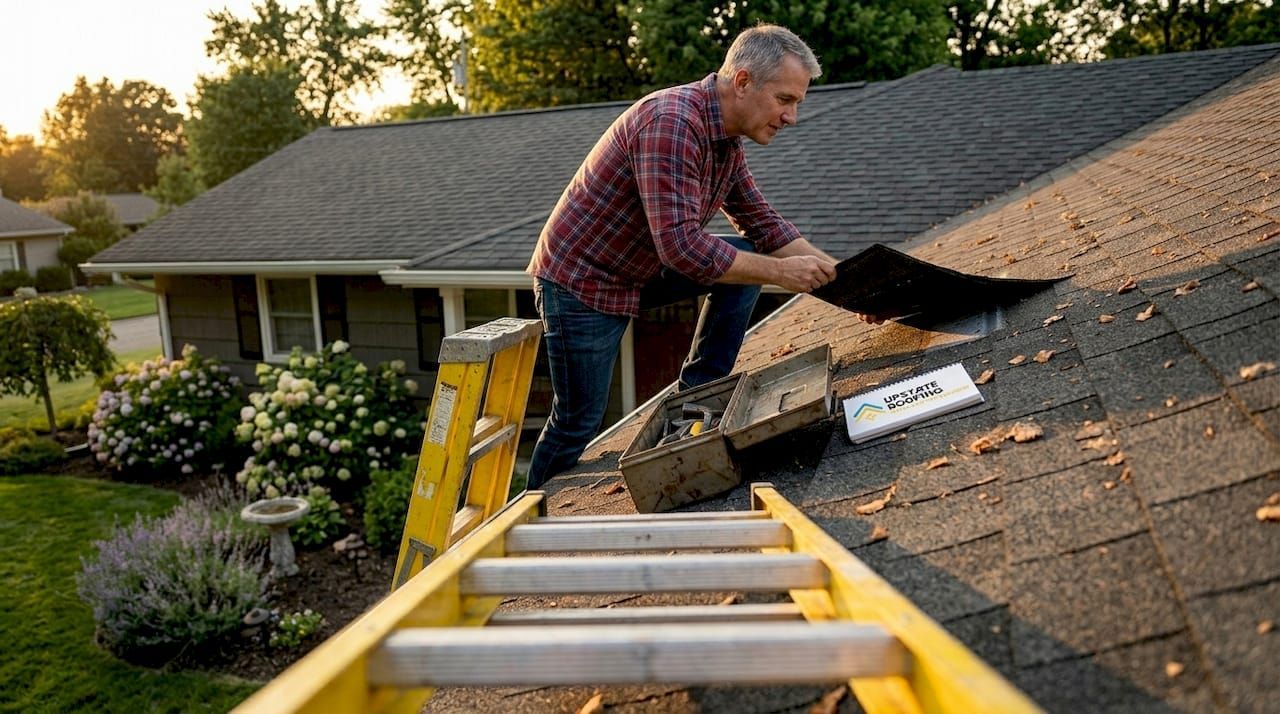
Pro Tip: Attach a ladder stabilizer bar (also called a standoff) to keep the ladder away from the gutter itself. Leaning directly against the gutter can bend it or knock it loose, creating a new problem while you are fixing an old one. Follow handyman safety guidelines to set up correctly every time.
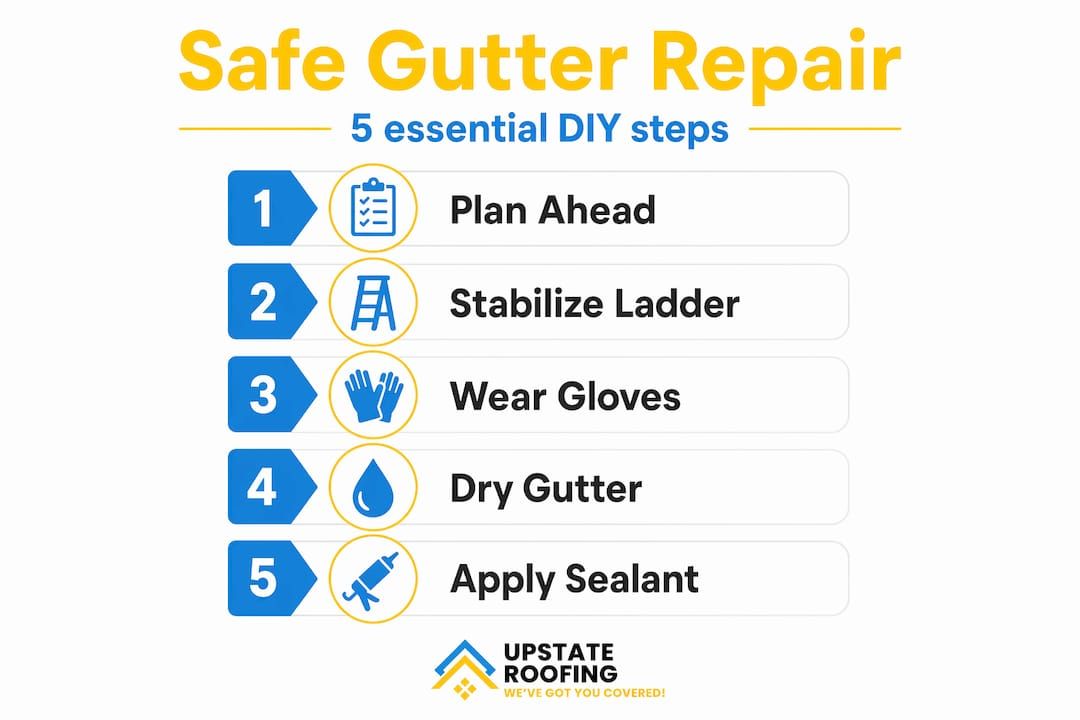
Safety first: preparing for DIY gutter repair
Gutter repair is one of those jobs that feels simple until something goes wrong at 12 feet off the ground. The preparation you do before the first step up the ladder is what separates a successful repair from an emergency room visit.
Safe setup checklist:
- Check the weather forecast. Never work on a ladder when rain, wind, or frost is expected.
- Inspect your ladder for cracks, bent rungs, or loose hardware before every use.
- Set the ladder on firm, level ground. Use leg levelers on uneven terrain.
- Have a second person hold the base of the ladder when possible.
- Wear non-slip footwear, not sandals or old sneakers with worn soles.
- Keep tools in a tool belt or bucket hook so both hands stay free.
- Never lean past your hips to either side while on the ladder.
Falls from ladders account for a significant share of home improvement injuries each year. Most happen not because of equipment failure, but because of improper setup or overreaching. Taking five extra minutes to position your ladder correctly is not being cautious — it is being smart.
The handyman ladder tips from experienced tradespeople are worth bookmarking. And if you want a deeper look at what can go wrong with gutter work specifically, our gutter repair safety resource covers common pitfalls we see on job sites.
As This Old House recommends, if you are not confident with ladder work or power tools, the risk often outweighs the savings of doing it yourself.
Pro Tip: Schedule your repairs for a dry weekday morning. Weekend afternoons in Upstate NY can shift from sunny to breezy quickly, especially in spring and fall. Dry daylight hours give you the best visibility and the safest working conditions.
Step-by-step DIY gutter repair workflow
With your tools ready and your safety plan in place, here is how to actually fix the problem. This process applies whether you are repairing a leaking seam, reattaching a sagging section, or correcting a slope issue that is causing water to pool.
The core repair workflow:
- Inspect the entire gutter run from the ground first. Look for visible sags, separated seams, rust spots, and areas where water stains the fascia board.
- Clean the gutter thoroughly. Remove all debris, flush with a hose, and scrub any algae or grime from the area you plan to seal. How to clean gutters properly before any repair is not optional — it is the difference between a fix that holds and one that peels off in six months.
- Repair the mechanical issue first. Re-secure loose hangers with sheet metal screws, replace bent spikes with modern screw-style fasteners, and realign any sections that have pulled away from the fascia.
- Seal leaks and patch holes. Apply exterior-grade sealant to seams from the inside of the gutter. For holes larger than a quarter, use a metal patch or flashing tape before sealing over it.
- Test the repair by flushing the gutter with a garden hose. Watch for drips at seams, check that water flows toward the downspout, and confirm the downspout is detecting gutter leaks that may have been hidden before the flush.
Clean before you seal, every single time. Sealing over debris or moisture is the number one reason DIY gutter repairs fail within a season. The gutter surface must be dry and free of grime for any sealant to bond properly.
The Lowe's gutter repair guide confirms this exact workflow: inspect for sagging, leaks, and clogs, clean and dry the area, make the mechanical correction, seal, and then flush with water to verify.
| Repair type | Difficulty | Tools needed | When to use |
|---|---|---|---|
| Patching a small leak | Easy | Sealant, caulk gun, brush | Pinhole or seam gap |
| Reattaching a hanger | Easy | Drill, screws | Sagging section |
| Adjusting slope | Moderate | Drill, level, new hangers | Water pooling in gutter |
| Replacing a section | Hard | Tin snips, new gutter, fasteners | Crushed or cracked run |
For slope issues, the standard rule is a quarter-inch drop for every 10 feet of gutter run toward the downspout. If your gutter is flatter than that, water sits and eventually leaks or breeds mosquitoes. Correcting gutter slope requires removing and repositioning hangers, which takes more time but is still manageable for a confident DIYer.
Pro Tip: Flush the gutter twice — once before the repair to locate every leak, and once after the sealant cures to confirm everything is sealed. One flush is never enough.
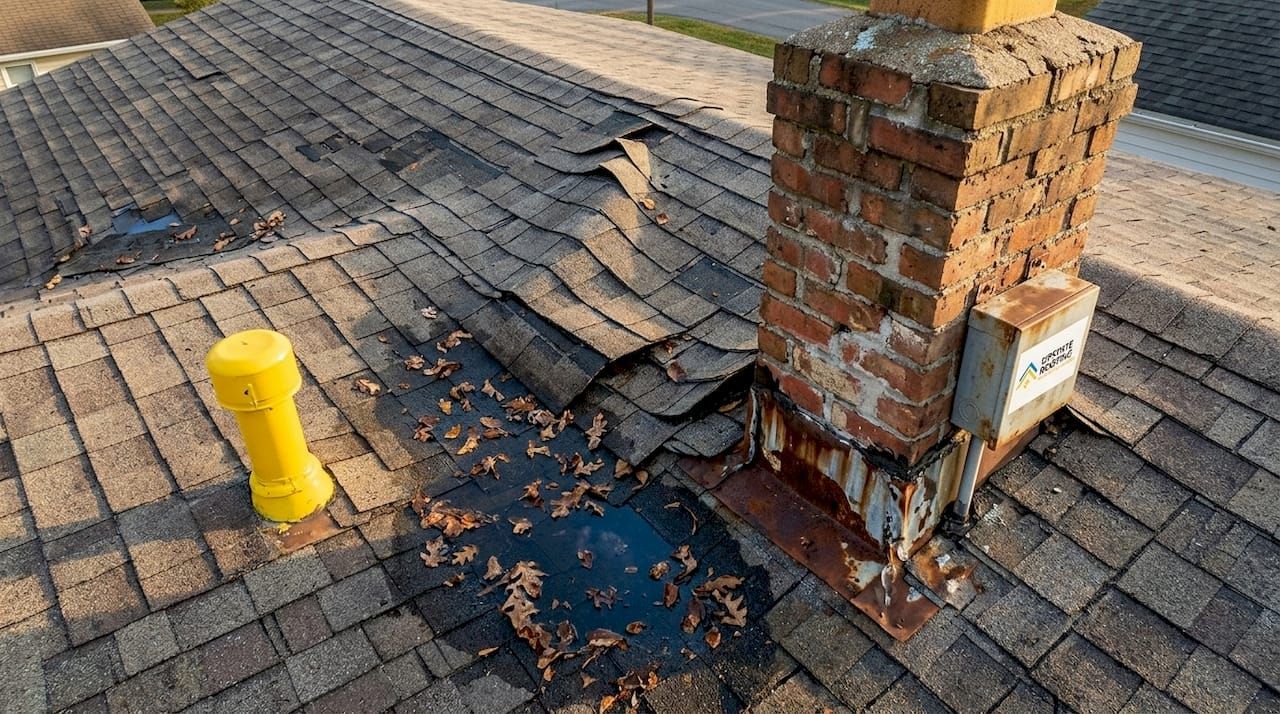
Troubleshooting and knowing when to replace
Not every gutter problem is fixable with a tube of sealant and a Saturday afternoon. Part of a good gutter repair checklist is knowing when you are past the point of repair and into replacement territory.
Signs your gutters need replacement, not repair:
- Sagging along multiple sections , not just one hanger point
- Cracks or splits longer than a few inches , especially near seams
- Rust that has eaten through the metal , not just surface oxidation
- Fascia board rot behind the gutter (the wood the gutter mounts to)
- Recurring leaks at the same spot after two or more repair attempts
- Gutters pulling away from the roofline due to structural movement
Sagging, rot, and chronic overflow are replacement signals, not patching opportunities. When the structure itself is compromised, new sealant just delays the inevitable and can mask water damage that is quietly spreading behind your walls.
Pro Tip: Before you repair any section of gutter, press your thumb firmly against the fascia board directly behind it. If it feels soft or spongy, you have rot. Sealing the gutter without addressing the fascia means you are attaching a repaired gutter to a board that may fail within a year. Check out our guidance on identifying replacement needs and expert roof repair advice if you find damage beyond the gutter itself.
Expert tips for Upstate New York homes
Generic gutter repair tips work anywhere. These are tailored to the specific conditions Upstate NY homeowners deal with every season.
Region-specific gutter repair tips:
- Clean gutters in late October and again in early April. Fall leaf drop clogs gutters before winter, and spring thaw brings debris from ice damming. Two cleanings per year is the minimum here.
- Avoid sealing gutters when temperatures are below 40°F. Most sealants require a minimum application temperature, and cold metal causes them to cure improperly and crack within one freeze-thaw cycle.
- Check hanger spacing after every winter. Ice weight can pull hangers loose even when they were tight in the fall. Standard spacing is every 24 to 36 inches, but in heavy snow zones, closer to 18 inches is smarter.
- Choose aluminum over vinyl if you are replacing a section. Vinyl becomes brittle in sustained cold and can crack under ice load. Aluminum handles Upstate winters far better.
- Inspect downspout extensions to confirm water is being directed at least four feet from your foundation. Frost heave can shift splash blocks and extensions over winter.
The Modernize sealing guide stresses that exterior-grade gutter sealants must be compatible with your specific gutter material and applied to a clean, dry surface. In Upstate NY, that means watching the forecast carefully because even a morning frost can compromise a seal.
For more on timing your maintenance around the seasons, our seasonal gutter cleaning page breaks it down month by month. And if you are also thinking about your yard and landscaping prep, this garden winter clean-up guide pairs well with your fall home maintenance routine.
Pro Tip: After applying sealant, give it a full 24 hours to cure before any rain or freezing temperatures. Rushing this step is the single most common reason repairs fail before the first winter storm.
What most DIY guides overlook about gutter repair
Here is the uncomfortable truth about most gutter repair DIY guides: they tell you what to do, but not why repairs fail. And the failure rate on DIY gutter sealing is higher than people admit.
The most common mistake is sealing over a dirty or damp surface. It seems obvious when you read it, but in practice, most homeowners wipe the area with a rag and consider it clean. That is not enough. Algae, oxidation, and even invisible moisture trapped in a seam will prevent sealant from bonding properly. The repair looks fine for a few weeks, then peels away in the first hard rain. The Lowe's guide is explicit: clean and dry the area fully before any sealant goes on.
The second thing most guides skip is the verification step. Finishing a repair and calling it done without a water flush is like changing a tire and not checking the pressure before driving. You need to run water through the gutter and watch every seam, joint, and downspout connection while it flows. Our cleaning gutters thoroughly guide walks through what to look for during that flush.
The third oversight is patience. Sealant that cures for 24 to 48 hours in dry conditions outperforms sealant that was rushed every single time. The chemistry is simple: the product needs time to fully cross-link and bond. A repair done on a Tuesday that is left alone until Thursday will outlast a repair done on Saturday morning and tested Saturday afternoon.
DIY gutter repair is genuinely within reach for most homeowners. But "within reach" does not mean "quick." The jobs that hold up for five or more years are the ones where someone slowed down, cleaned properly, cured fully, and verified with water before putting the ladder away.
Get professional support for gutter and roof care
Sometimes a gutter repair reveals something bigger. A rotted fascia, a compromised roof edge, or a downspout issue that traces back to a drainage problem around the foundation. When the scope grows beyond what a tube of sealant can handle, it is worth calling in professionals who work on Upstate NY homes year-round.

At Upstate Roofing Pros, we handle everything from professional gutter cleaning and repair to full roof repair services and ongoing roof maintenance plans built around the demands of the regional climate. Our licensed team uses premium materials rated for freeze-thaw conditions, and we back every job with the kind of workmanship that holds up through an Upstate winter. If you have done the inspection and the scope feels beyond DIY, reach out for a professional assessment before small damage becomes a major expense.
Frequently asked questions
What type of sealant should I use for gutter leaks?
Choose an exterior-grade silicone or polyurethane gutter sealant that is compatible with your gutter material, and always apply it to a completely dry surface. Gutter sealant compatibility with the specific material — aluminum, vinyl, or steel — is non-negotiable for a lasting bond.
How long should gutter sealant cure before it gets wet?
Let gutter sealant cure for at least 24 hours before exposing it to rain or running a water test. Joint seam repairs require dry conditions and a full cure window before they can be considered complete.
Can I patch a gutter if it's sagging or the fascia is rotting?
Sagging gutters or a rotting fascia indicate structural problems that patching cannot solve. Sagging and fascia rot are replacement signals, not repair opportunities.
Is it safe for any homeowner to repair gutters themselves?
DIY gutter repair is safe only if you are genuinely comfortable on ladders and confident with basic tools. DIY gutter repair carries real safety risk for anyone who is not experienced with ladder work, and hiring a professional is the smarter call in that case.
How can I check if my repair worked?
Flush the gutter with a garden hose after the sealant has fully cured and watch every seam and joint for drips. Repair verification by flush is the only reliable way to confirm a fix before the next rainstorm does the testing for you.
Recommended
Recent Posts